Learn Git
Made byNima Jamalian
Table of Contents
How Git Works?
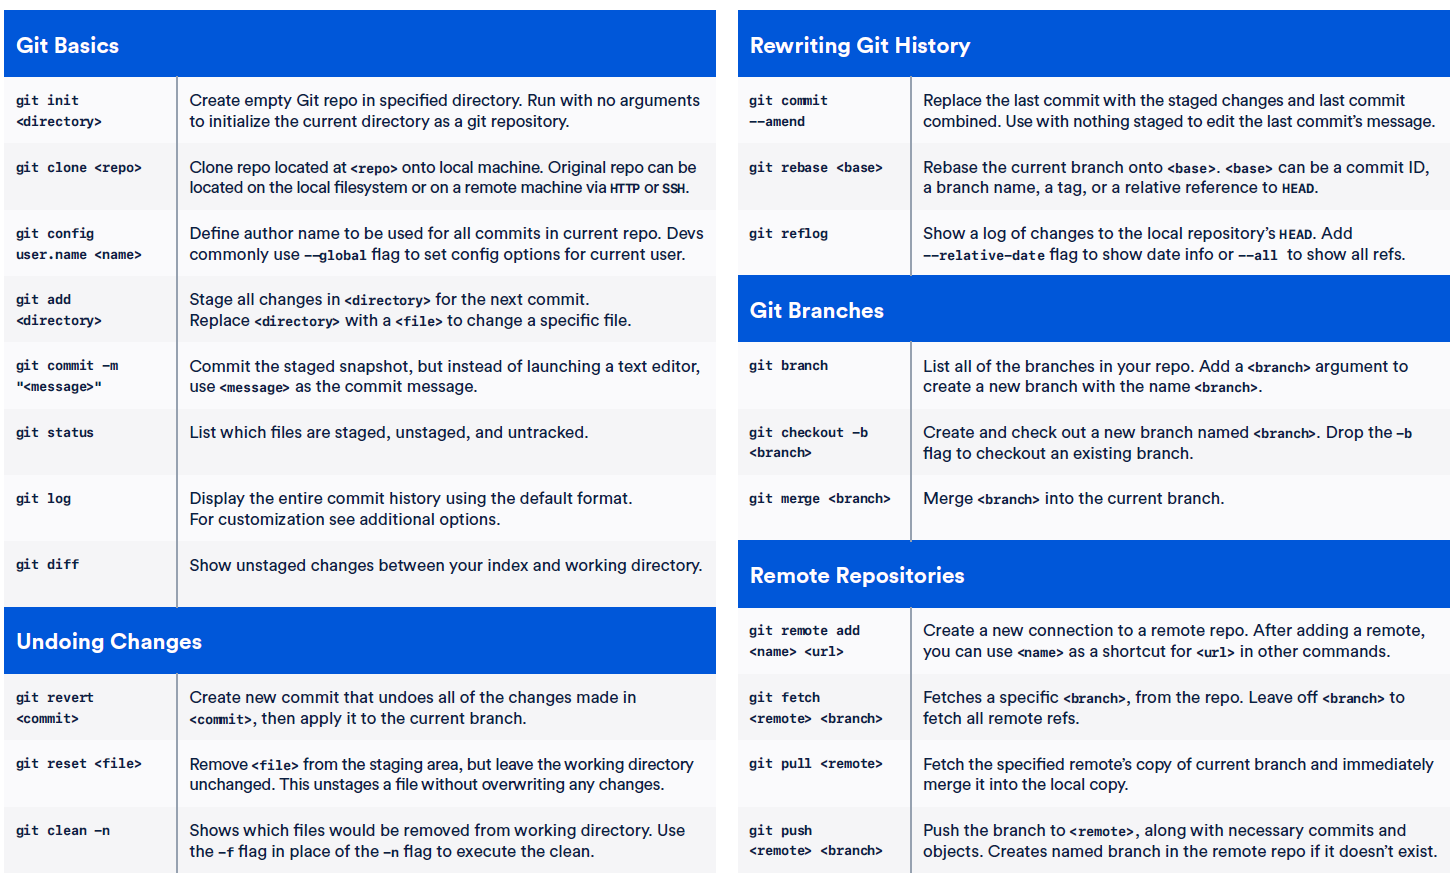
Git Cheat sheet
.png)
git cheat sheet diagram above while you are reading the notes, it will help you to visualize all the git commands and improve your learning.In this guide I will be using command line and GitHub website.
If you are on Mac you can use terminal.
If you are Windows, download git bash and run the the command in Git Bash application.
Initialize Git Repository
In order to initialize a git repository first you need to navigate to the repository you want to initialize as git repository. Run the commands bellow in your command line app.
cd yourFileLocationOnce you are there run the commend bellow. This command initializes git in our directory.
git initFor navigating through file in git you can use
cd fileDirectionif you want to go back one step in directory you use command bellow.
cd ..Checking What Is Inside a Repository
In order to view the files inside the repository, once you are there you can run the command bellow.
lsChecking What's Is In Your Staging Area
In order to check what is in your git staging area which is the area in the middle of git. You use the command bellow
git status If you have untracked file this command will highlight them for you. Untracked files are the files that are in your working directory but they are not yet in the staging area and git repository.
It also shows the files that are you already have in your git repository but have been modified.
Adding Files To Git Staging Area
You can use the command bellow
git add fileNameOr if you want to add all of the files you can do. It's very common to use this command instead of adding all the files one by one.
git add .Removing Files From Staging Area
Sometimes you might make a mistake and add a file which you don't want to track to staging area.
In order to reverse that you can use the command bellow.
If you want to go to previous state, meaning you keep all of tracked files that you had before only removed what you added previously from staging area.
git resetif you want to remove everything from staging area, this includes files that you have added in previous commits you can use command bellow.
git rm --cached -r .if you want to remove a specific file from staging area this includes files that you have added in previous commits you can use command bellow.
git rm --cached -r fileNameHow To Commit Files
Commit mean we are moving our files from staging area to the version control.
git commit -m "Your Message"-m means you want to add a message to commit, so later if you go back to your commit history you easily identify what you did in that commit.
Checking Commit History
In order to check the history of your commit you can use the command bellow
git logExample of git log
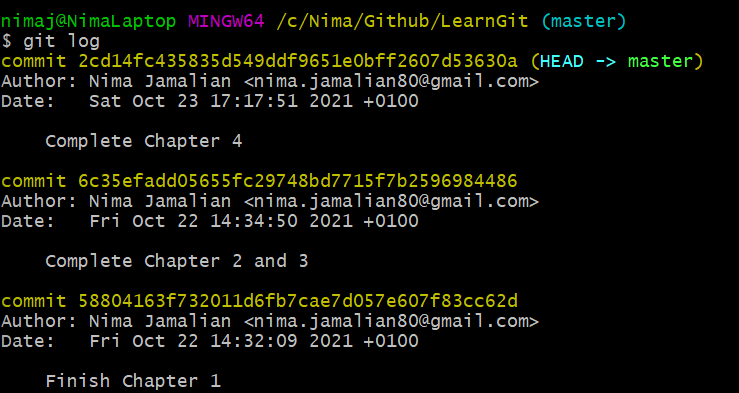
Each commit also has a hash, which a unique identifier for each commit. You can also view who made the commit and the date and time and also the commit message.
Checking Difference
Sometimes you may want to check the different between the file in your working directory and repository. In order to that you can use the command bellow.
git diffThis will show all the files that have been changed.
If you want to check the difference for a specific file you can use the same command as before but this time specify the file that you are looking for.
Going Back To The Previous Version
Let's say you have messed up your file and now you want to go back the previous version in your repository you can use the command
git checkout filenameRemote Repository
You can also create remote repository, which is repository that is hosted on a server or on another computer. The best and most popular git platform is GitHub and it's also free!
You need to create account if you want to use GitHub, use the link below.

You can create a new repository on GitHub website and GitHub would give the credentials so you can push your files or local repository to the GitHub remote repository.
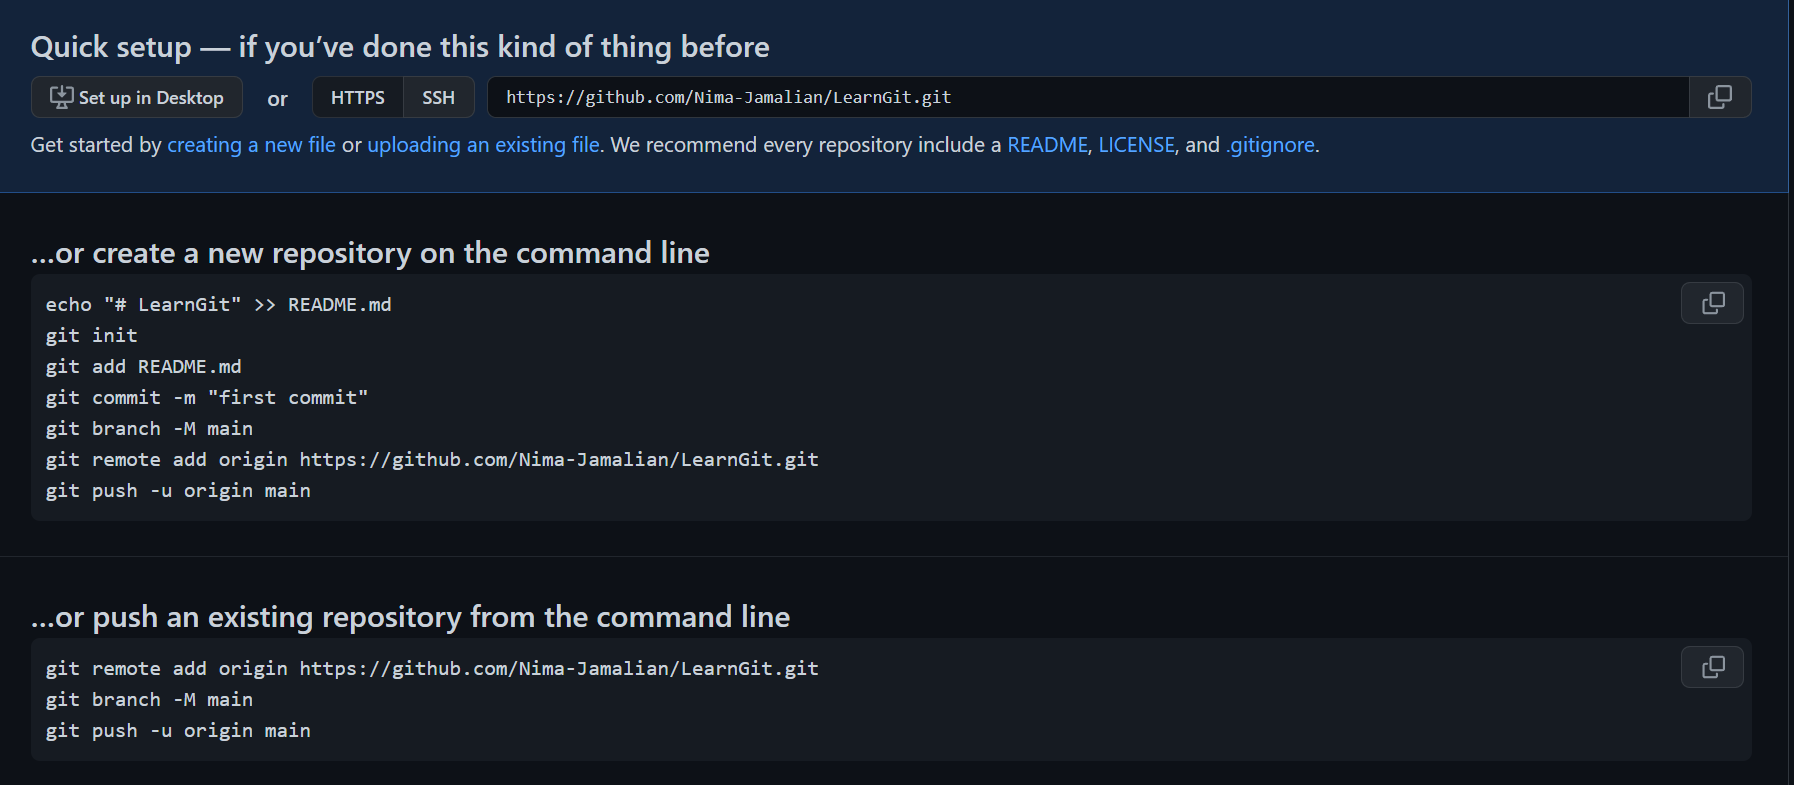
In order to setup a remote repository using GitHub they are two methods you can use the application or the command line. Using command line is highly recommended while working with git as it has more functionality. The GitHub application is useful when you have multiple git repository, the app helps you find them easily and you can push your changes.
In order to setup our remote repository and connect it to our local repository.
We add a remote git to our local git and give it the address of our remote repository, which was provided to use in the GitHub website after we created the remote repository. (HTTPS address)
git remote add origin yourRemoteGitRepoAdressdOnce you execute the command above, the remote gets created.
main instead of master to migrate away from biased terminology (more details available here).Push To Remote Repository
Now we can use the git push to push our local git to remote git repository using the command bellow.
git push -u origin master master branch is the main branch or the default branch of your repository. You can have more than one branch in a git repository.
Once you execute the code above your local repository gets uploaded to your remote repository.
And you can see all your files in the GitHub and you can see also all of your commit information.
Git Ignore
Sometimes we may want git to ignore some of our files. For example we might have a file that have our password and we don't want them to get track by git and be in our remote repository. In order to that we can create a gitignore file. Another use of gitignore is for not tracking the DS_Store files. DS_Store refers to the files that relates to our customizations and preferences so other users don't need to download it.
In order to create a .gitignore file, first navigate to your git repository
touch .gitignoreto verify that the gitignore file has been created you can command bellow and which shows all the files in your repository.
.gitignore file is a hidden file which mean you may not see it in the folder but command bellow will show hidden files as well.ls -aNow you open the .gitignore file and add the file you want to ignore file. You just write down file name. Use each line for only one file name.
Example: Let's say that I have a file sceretFile.text which I have stored my website passwords on it and I don't want this to be track by git and want to add it to my .gitignore file.
I will add the link bellow to my .gitignore file.
sceretFile.textIf you want to comment in .gitignore file you use
#If you want git to ignore all files that have a certain file type
*.fileType

#Example ignore all .text files
*.text
Cloning
Using git we can clone a remote repository and pull it in to our machine. This process is called cloning. This will bring all the commits/all the versions of a remote repository to our working directory.
First Find the project you are interested in cloning.
For Example I want to clone this project
In GitHub click on code and copy the HTTPS path, we are going to use this for cloning.
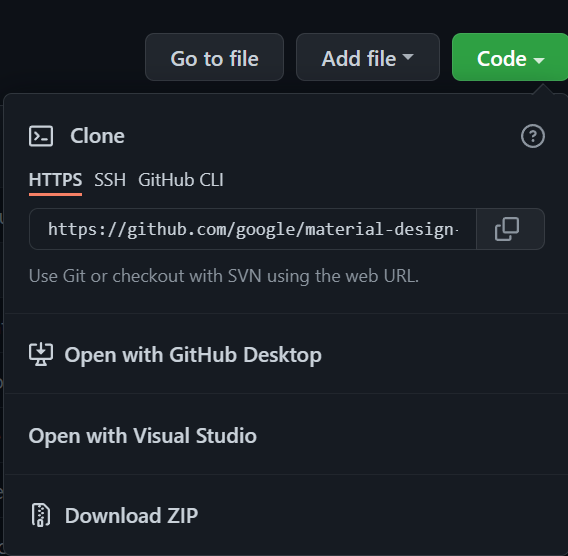
Navigate to the directory which you want to clone this project and run the command bellow.
git clone ProjectAdress


//Example
git clone https://github.com/google/material-design-lite.git
Now if you navigate to the repository that you have cloned and run the command git log you can view commit history of the project.
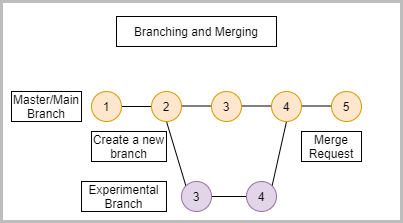
Branching And Merging
Git give us the ability to create branches we can also merge these branches together and it is very useful. Usually when you are developing an application you have a master/main branch and you also have experimental branch here you can test your new features and once they are ready you can marge the experimental branch to the master/main branch. In the meantime while you are working on experimental feature you can also work on your main branch and push updates to your application.
Creating New Branch
In order to create a new branch for your git repository, navigate to your git repository in command line and run the command bellow.
git branch branchName

//example
//let's say I want to create branch for my closing animation to test out
git branch closing-animation
Check The Branches In Git Repository
In order to check the branches in git repository run the command bellow.
git branchThis will show all the branches you have in your repository and your current branch that you are in. There will be a asterisk * next to the branch that you are on.
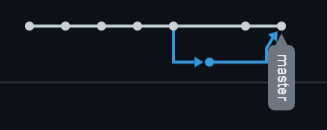
For example: I have two branches in my directory. One is master and the other one is called sad-ending. If run the command "git branch" I will see

The * next to master branch shows that right now I am in the master branch.
Switch Branches
If you want to change between branches in your repository you run the command bellow
git checkout branchName

//Example:
//I want to go to a branch called sad-ending
git checkout sad-ending
After you run the command you can see that git has switch to the branch you have specified.

Once you are in the new branch you have created you can make your change and the commit them link you normally would.
git add .
git commit -m
You can also view the the commit history of each branch, one you are in the branch run the command git log.
You can also push this branch to your remote repository same way as before
git push -u origin branchNameOnce you push the new branch to your remote git repository such as GitHub you can see it in your branch network.
Merge Branches
You can merge your branches together. First you need to go to your base branch which usually is your master/main and then run the command bellow to merge another branch with your main branch.
git merge branchName

//Example
git merge sad-ending
//This will merge branch sad-ending to my master branch
Once you run above command, command line will take you to the Wim interface. In there you can write comment for the merge branch or you can just leave the default comment which is fine. In order to quite the Wim interface run the command bellow.
:q!Merge branch 'mergedBranchName'Now if you push this to your remote git repository such as GitHub you can see your branch network in there as well. Go to → Insights → Network
Example:
As you can I made a new branch and then merge it with my master branch.
You can do all of this in GitHub Website as well. You can create new branch and merge them together.
Interactive Website To Learn Git Branching
This is a good website to practice your understanding of git branch concept.

Forking And Pull Requests
So far we have focus on local and remote git repository and their functionally now we are going to cover git features that allows to collaborate with other.
Now what if we don't have write access to that repository so we are not part of the repository team. Users don't have write access in public/private repository unless they are the owner of that repository or have been given special access by the owner.
In this case we are going to use git fork feature, first we fork that repository which means we make a copy of original repository in our own account and we can do whatever we want to it.
Now we can clone the repository we just forked (copied) and clone it so we can work on it locally.
Once we added our changes we can push them to our repository (this would be the repository which we forked).
If we want to notify the original owner of the repository about our changes we call use pull request to notify them and the reason it's called pull request and not push request is because we are not the original owner of the repository so what we do here is that we notify the owner about our suggestion and ask them pull our forked repository to the original repository. This process is like making a suggestion to the original repository owner to add our changes to the original repository.
.png)
You can also view the pull request history of open project.
Example:
Here you can view pull request that users made to Unity Open project. As you can see not all of them are huge changes but they are still helpful! So get out there and start contributing to some open source projects. 😁
Git Cheat Sheet
Made by Atlassian
Command Line Cheat Sheet
These are list of useful command which help you get around command line easier 😉.
To open a directory
cd directoryLocation
To go back to previous directory
cd ..
To make a directory(folder)
mkdire fileName
To create a file
touch fileName.fileTypeExample, I want to create a file called studentNames which is also a text file.
rouch studenNames.text
To open a file
On Mac
open fileNameOn Windows
start fileName
To open a file for coding (script files)
code fileName
To delete file
rm fileName
To delete all the files in a directory
rm *
To delete a directory
rm -r directoryName
To view files in a directory
ls
To view all files in a directory (Includes hidden files)
ls -a