
Guide On How To Build Unity Project On Windows For iOS
Made by Nima Jamalian
Table of Contents
Step 1
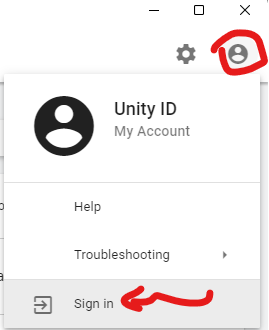
Unity ID
Make sure you have made a Unity ID, if you don't have one you can click on the link bellow and make an account.
Sign in with your Unity ID to Unity Hub
Open Unity Hub → Top right corner → Click on Avatar Icon → Sign In
Set 2
Create a GitHub
In order build Unity iOS application on Windows, we are going to need to use GitHub. Click on the link bellow and create a GitHub account.

Download GitHub
Next step is to download GitHub application and install it on your Windows computer. Click on the link bellow to download the application.

Once you downloaded the application sign in to your account inside the GitHub app.
Step 3
Create Apple Certificates
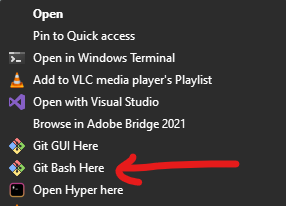
Create a new fold call it Apple Certificates → Right Click on it → Git Bash Here
Create key
Now we need to create .key file, in order to that run the following command in Git Bash that we opened.
openssl genrsa -out YourApp.key 2048
Yous should get a message similar to below
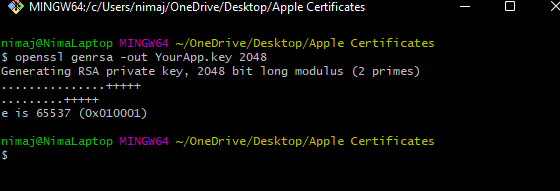
And a new file called YourApp.key should be created in your Apple Certificates folder.
Now run the command bellow
openssl req -new -key YourApp.key -out YourApp.certSigningRequest -subj "//emailAddress=youremail, CN=yourname, C=GB"This command will create another file in your Apple Certificate Folder called "YourApp.certSigningRequest"
Now go to Apple developer console click on link bellow
 https://developer.apple.com/account/resources/certificates/list
Go to Certificates → Click on Plus icon to create a new certificate →
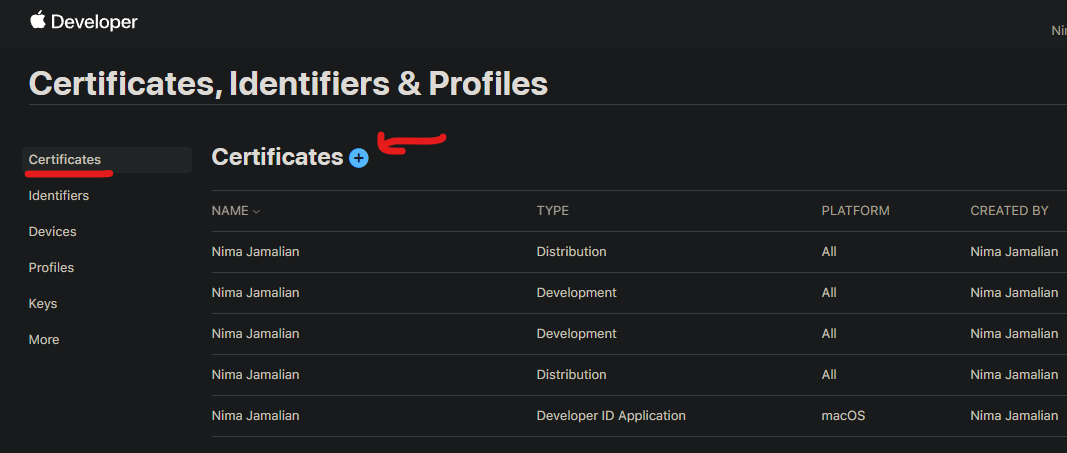
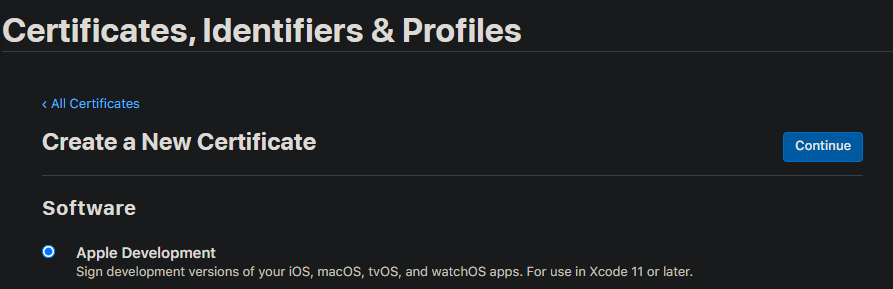
Select Apple Development ("This covers building application for iOS, macOS and etc.") → Click on Continue
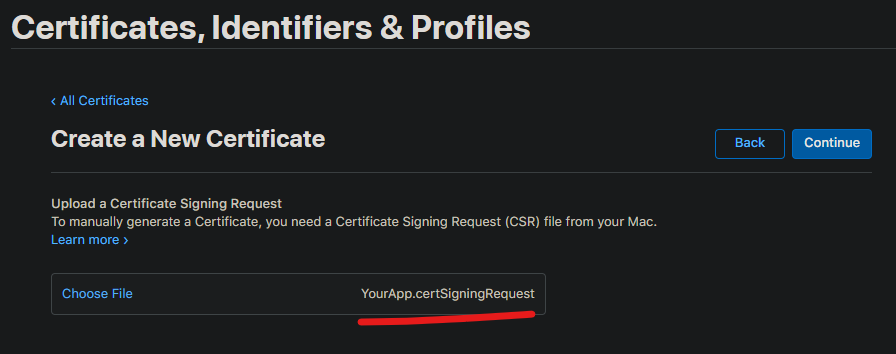
Now we need upload the YourApp.certSigningRequest file that we created this should be in your Apple Certificate Folder. Once the file uploaded click on continue.
Apple will generate a certificate for you. Then you can download this. Click on Download.
The file downloaded is called "development.cer" move this to Apple Certificate Folder.
Create an Apple ID for your app
Go to apple developer console → Identifiers section → Click on Plus Icon → Select App IDs → Click on Continue → Select App for Type → Click on Continue →
fill in the information
Description: WRITE YOU APP NAME HERE
Bundle ID: com.yourname.appename (don't use capital word here) App ID Prefix → Select you team ID
Example:

once you have filled the information click on continue. Click on Register. Now you should be able to see your app in the identifiers section.
Adding our phone as a tester device
Go to apple developer console → Devices section → Click on pulse icon →
Select Platform → For iPhone set to → iOS, tvOS,watchOS
Device Name → Give it a name
Device ID → Now we are going to learn how to get our phone UDID
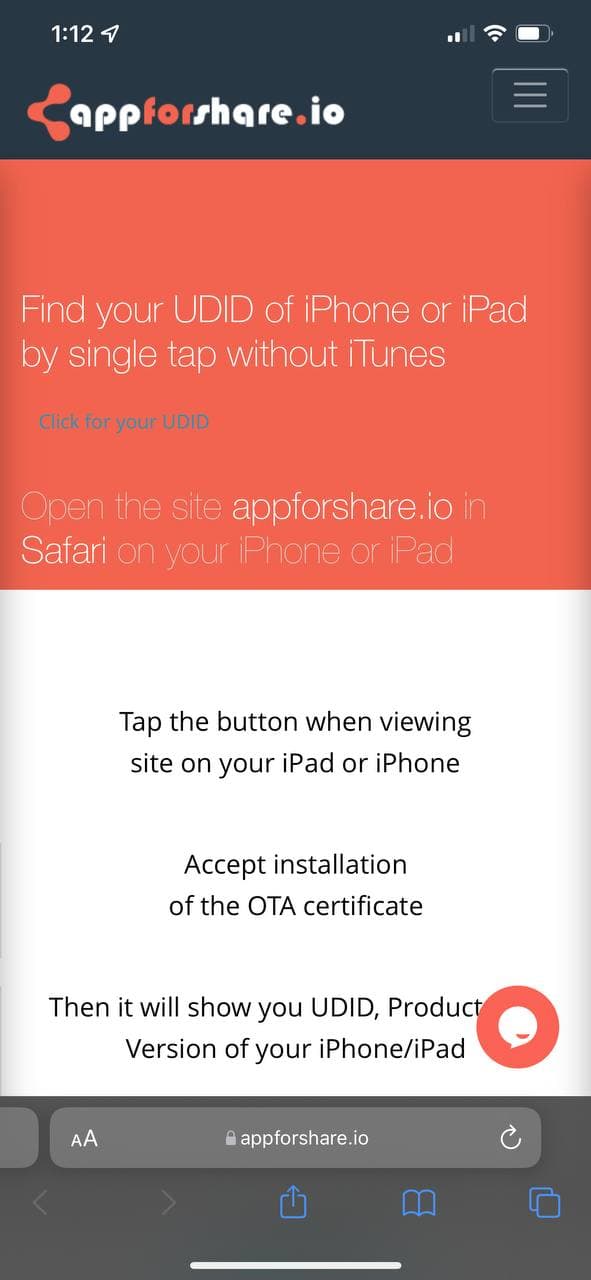
Open the link below
Scan the QR code in this website using your iPhone.
A website will open on your phone → Click on "Click for your UDID"
This will download a profile into your phone. → Go to Settings → General → VPN & Device Management → Select Get you UDID Profile
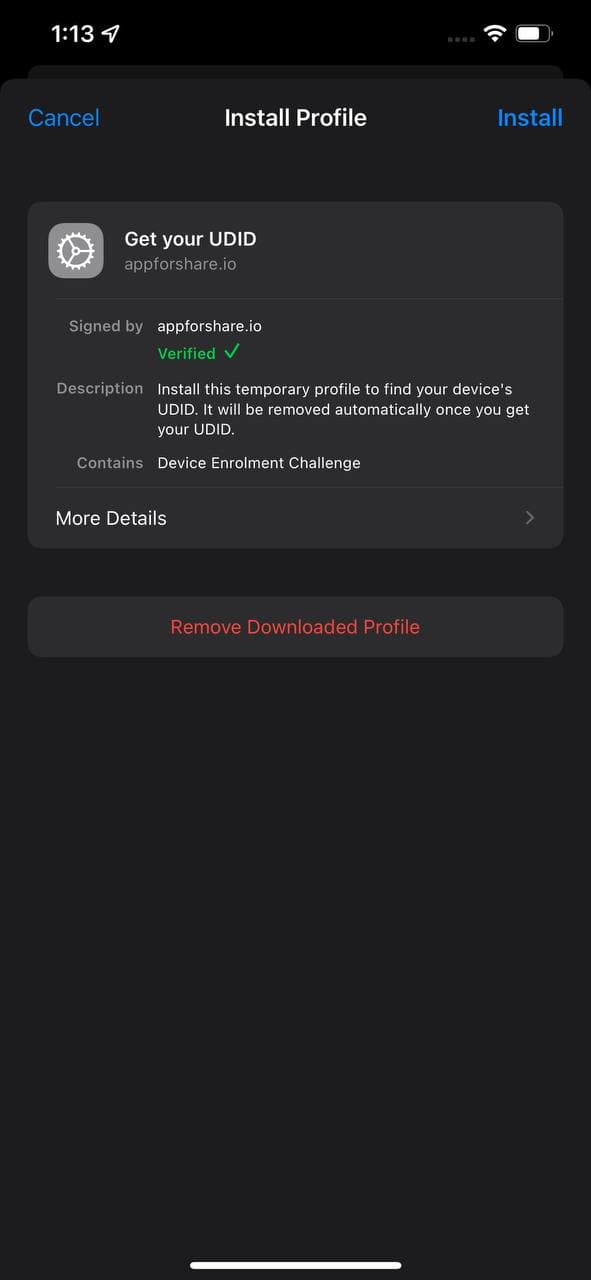
Click on install. After installing a web page would open that show your device UDID save that.
After this you can go back and delete the profile we just installed on phone since we don't need it any more.
Now enter the UDID in Apple developer console and click on continue and add you device register your device. This allows us to install our application on the device.
Creating Provisioning Profile
Go to apple developer console → Profile Section → Click on Pulse Icon → Select iOS App Development → Now you need to chose App ID → Select the App ID you created in the previous section → Click on continue → Select the apple development profile that we selected previously → Select your mobile device → Give the Provisioning Profile a name for example "YourName Profile" → Click on Generate → Click on Download → A new file will get downloaded with .mobileprovison extension → Move this file to our Apple Certificates folder
Creating .p12 certificate
Git Bash to Apple Certificates folder → and run the bellow command
openssl x509 -in development.cer -inform DER -out YourApp.pem -outform PEMThis will create a file called "YourApp.pem" in our Apple Certificates folder
Now we are are to create .p12 certificate folder, this will require you to enter a password. Make sure you remember this password as we need to use later.
openssl pkcs12 -password pass:0 -export -inkey YourApp.key -in YourApp.pem -out YourApp.p12This will create a file called "YourApp.p12" in out Apple Certificates Folder.
Step 4
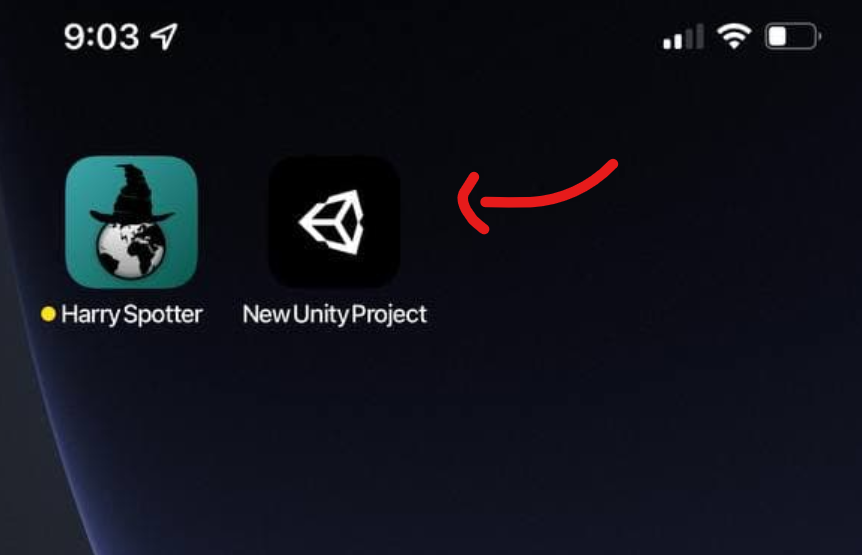
Create/open your Unity project.
Create a Unity project, we are going to use this project to build for our iOS device using Windows and Unity. If you already have a Unity project you can just open that.
Setting up project Build Setting
Click File → Build Setting → Player Settings → iOS Section → Other Settings → Go to Identification section → select Override Default bundle identifier → Set your bundle identifier (we made this previously in apple developer console) → Set you Signing Team ID (You can find this in apple developer console → Member ship → Team ID) → Enable Automatically Sign In
Step 5
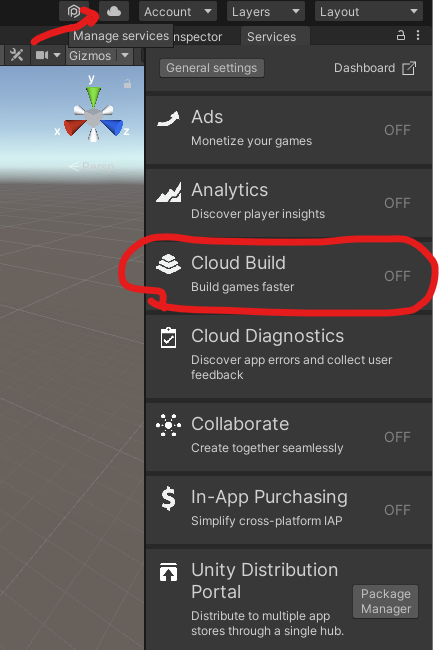
Activate Could Build
Instead of building project on our machine we are going to use Unity service that build iOS application using could services.
Click on → Mange Services (Button with cloud icon in Unity) → Then click on could build and turn it on
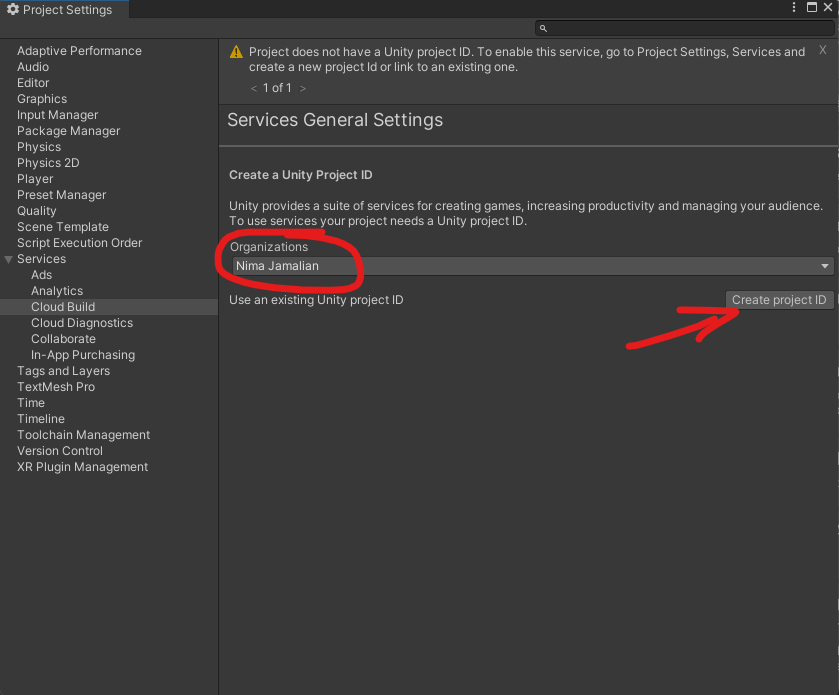
A new windows will open → here you need to select your organization → set to you account → click on create project ID
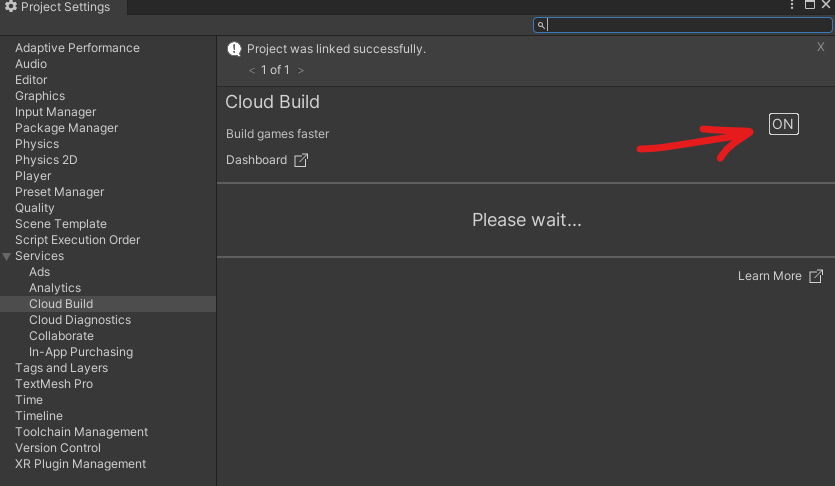
After that make sure you click on cloud build again to turn it on
Step 6
Uploading our Unity Project to Git
In order to use could build we need to upload our Unity project to a git repository.
Open Git application → Click on Add → Create a new repository
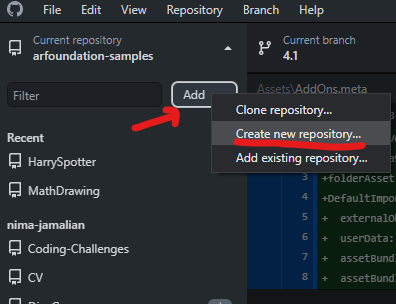
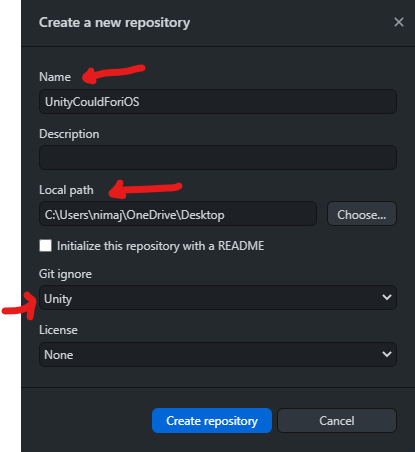
Give it a name
Chose a location for it
Select Git ignore → Select Unity
Click on Create repository
Click on Publish repository
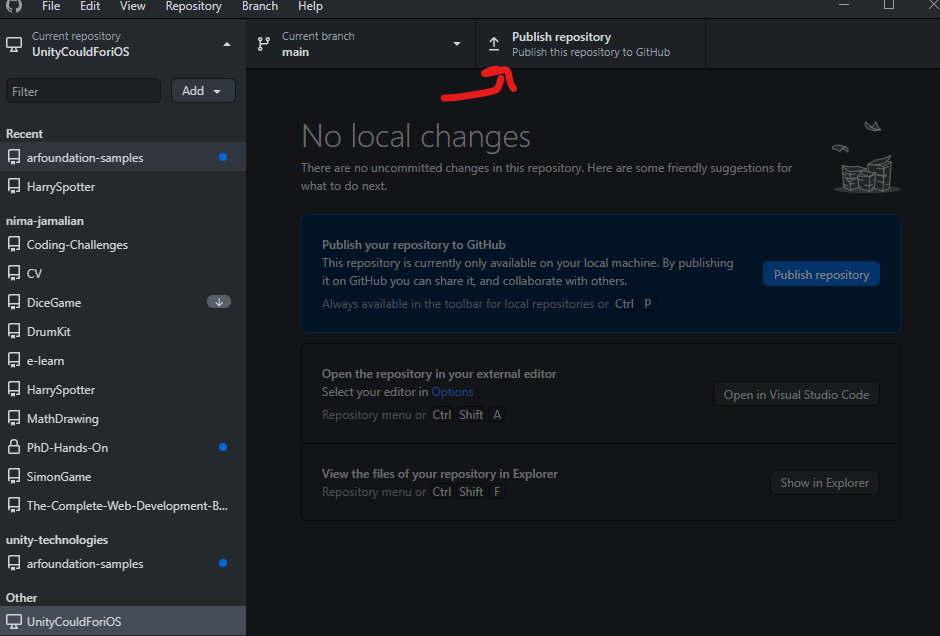
Deselect → Keep this code private → Publish repository
Now move your Unity project to this repository
Now go to GitHub select the repository that we created → you should see some file change that is being highlighted by the GitHub
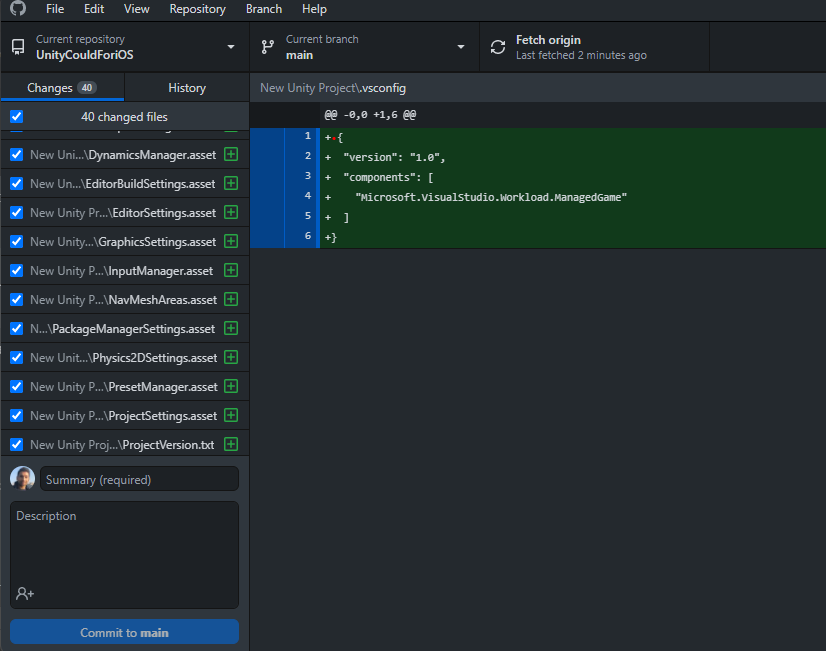
In Summary section write down project file → Click on Commit to main → Click on Push origin → Now we have uploaded our project file to out repository
Step 7
Setting Up Unity Could Build
Go to link below
Click on DevOps
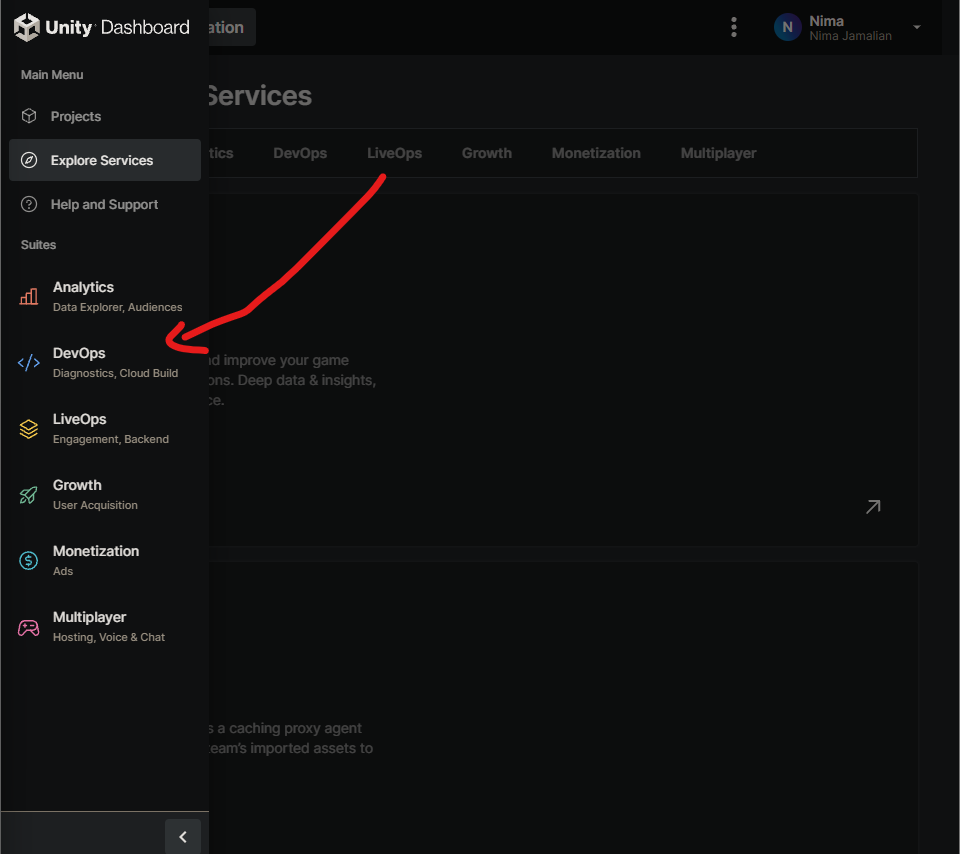
Select you app in the bar and then select set up could build
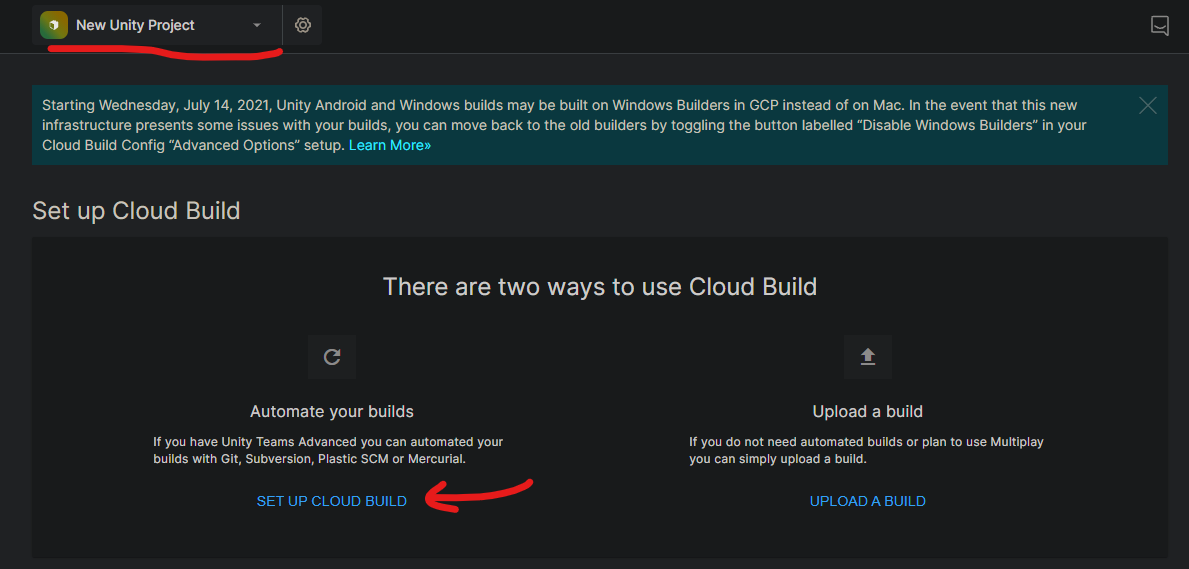
Select GitHub → Here you need to sign to your GitHub and give unity permission to access it.
Chose the repository we created → Click on Next: TARGET SETUP
In Cofig panel Click a new Setup New Target →
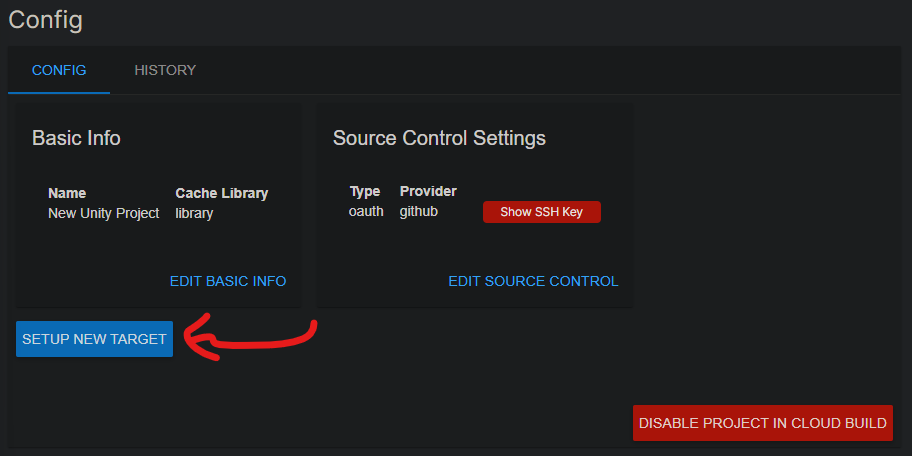
Click on iOS →
Project Subfolder → This should be change to folder name of your project folder. If you are not sure open your repository and see the folder name inside
Unity version → Select the unity version which your project was made in
→ Click on Next: Credentials
Now write down Bundle ID, we created this before in apple developer console
Give your device a name.
Upload the mobile prov file and p12 file from the Apple Certificates folder.
Enter the p12 Password which we created.

Click Next:Build → Now Unity will start building your application
If build is successful you get this message
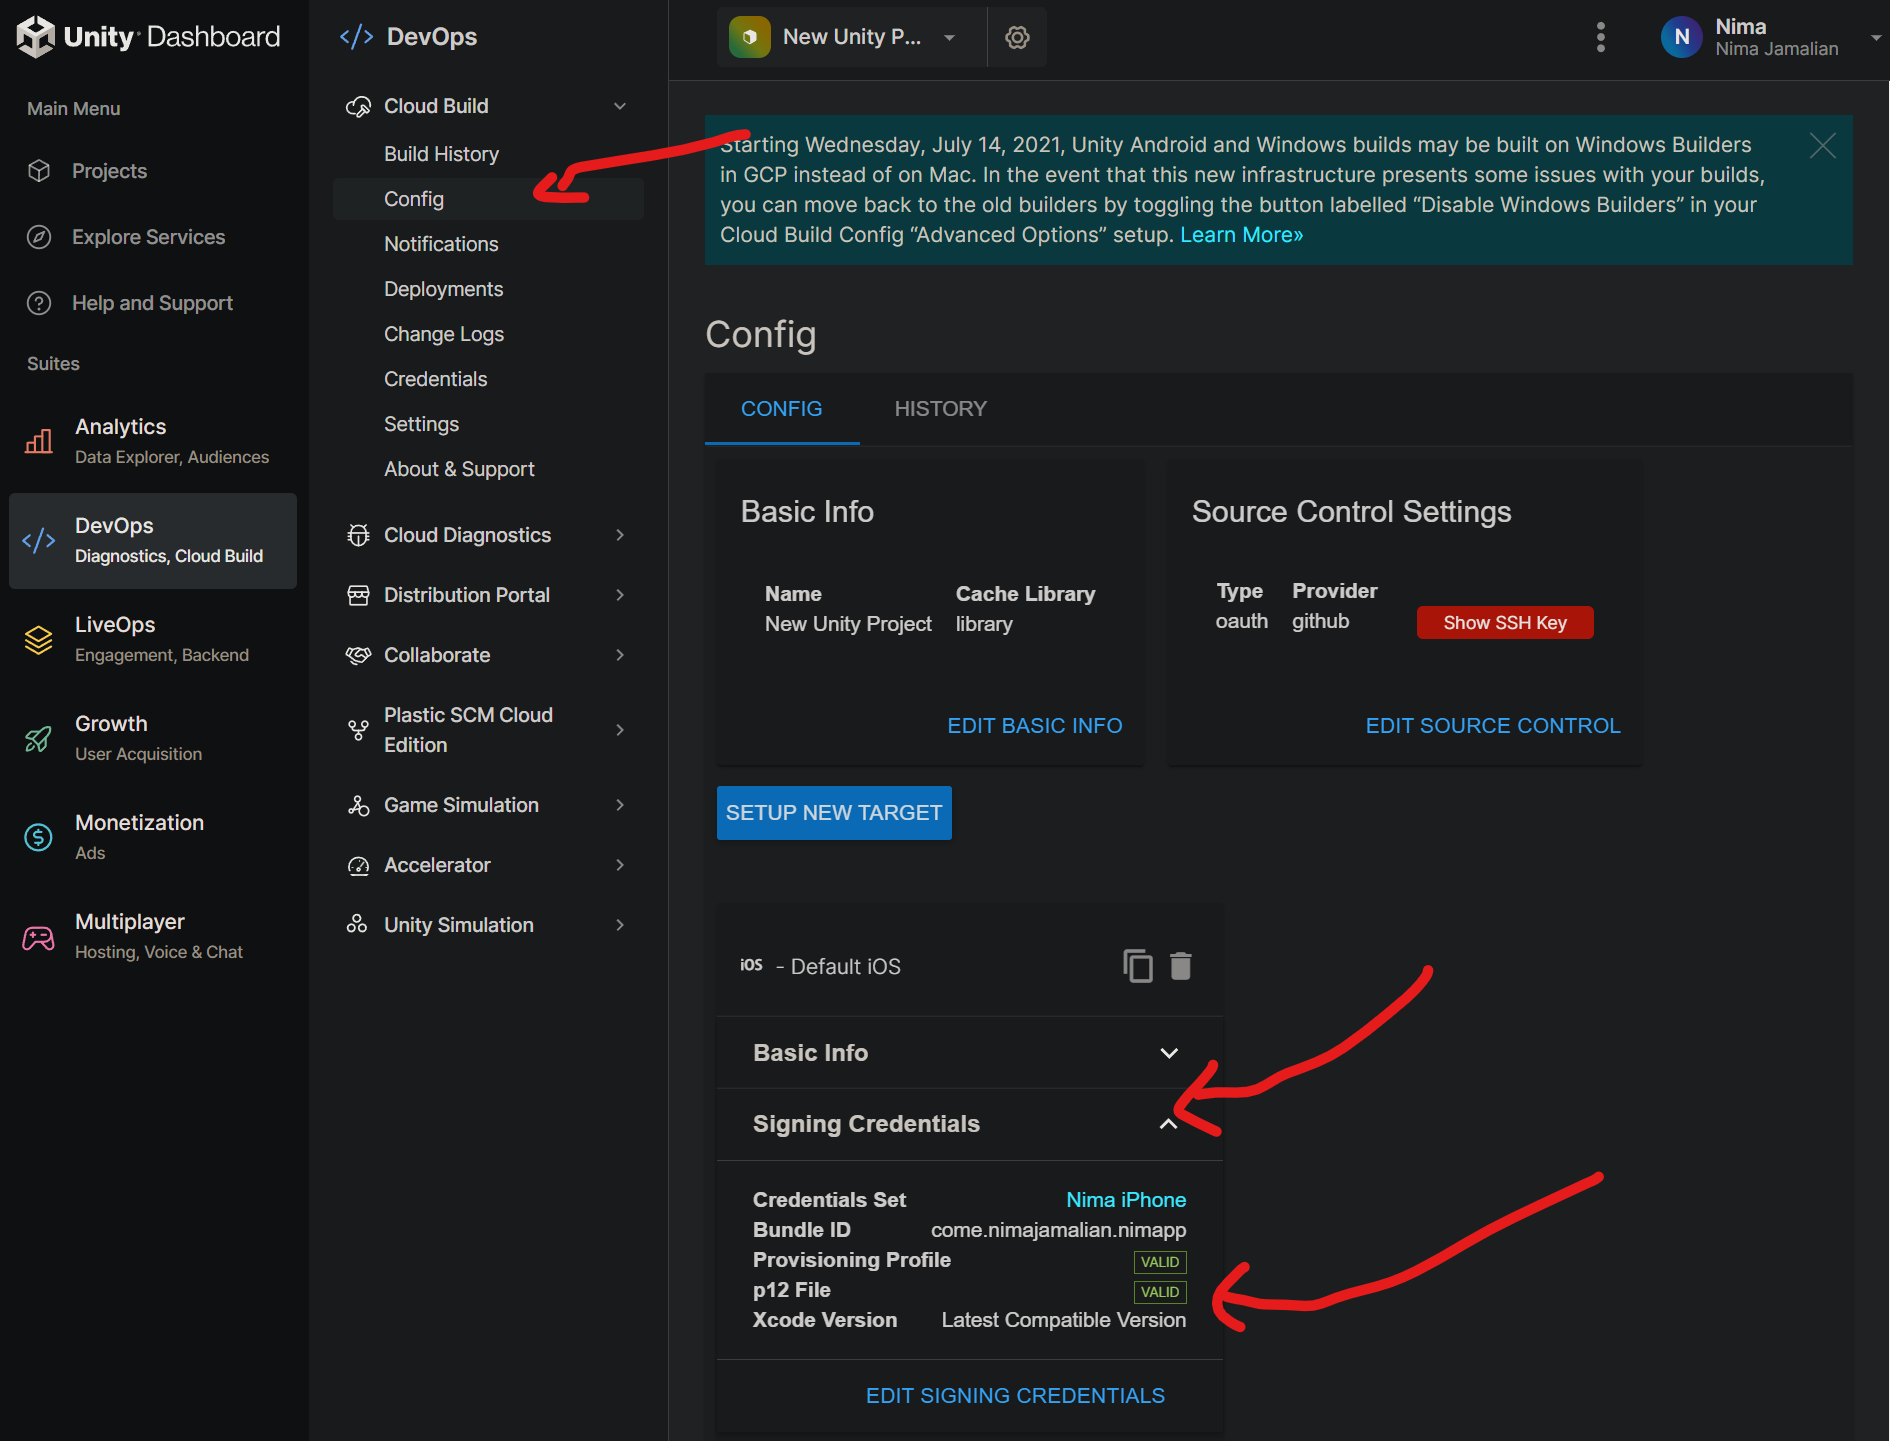
Let's make sure if your apple developer credential have been accepted by unity →
Go to Config → Signing Credentials→
If you see Provisioning Profile and p12 File marked as VALID it means your profile has been setup correctly. 🥳🎉
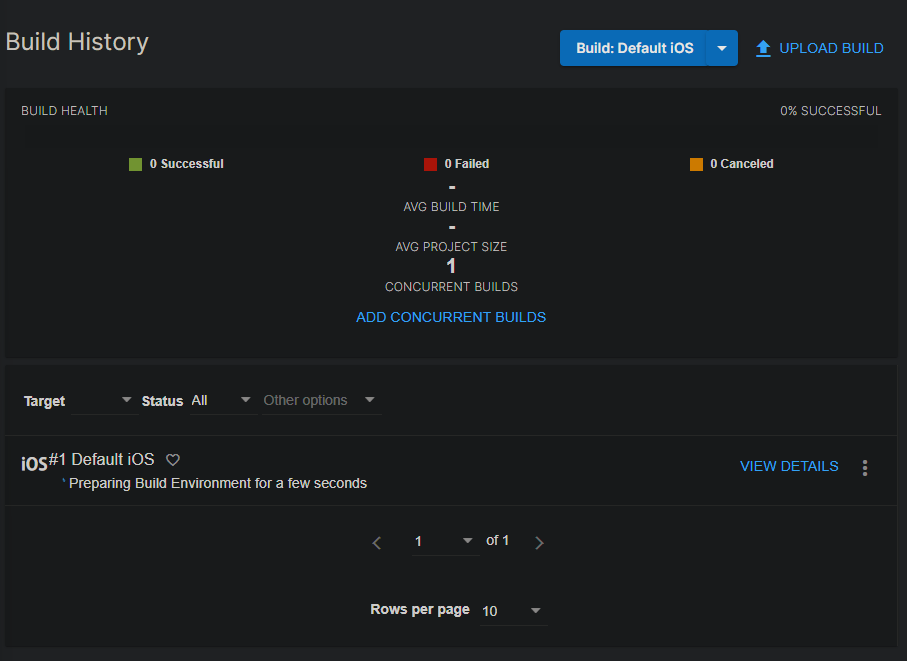
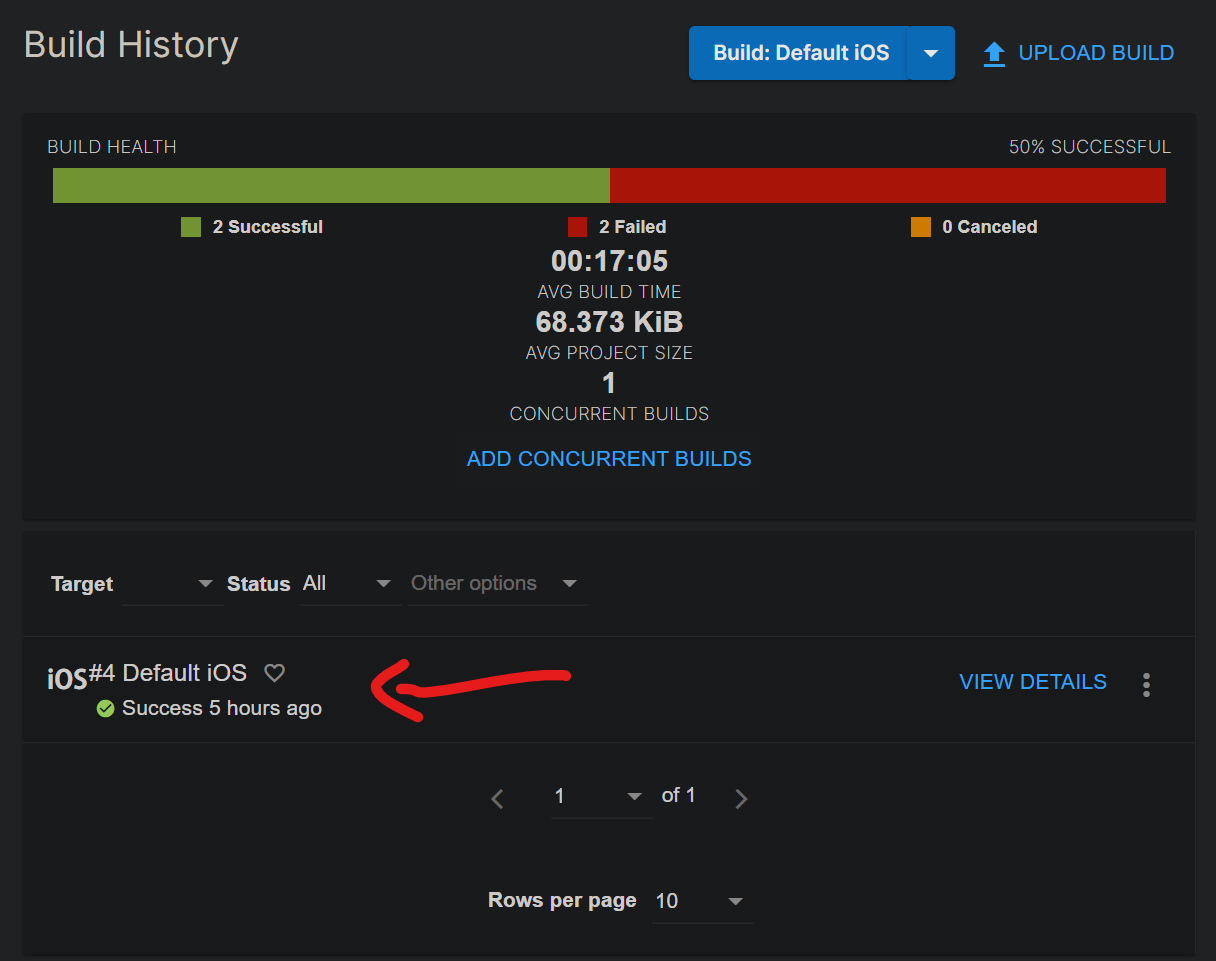
Checking the status of Build
In Unity dashboard just go Build History and you can see if your project has been build or not.
Build Successful, Phone Install
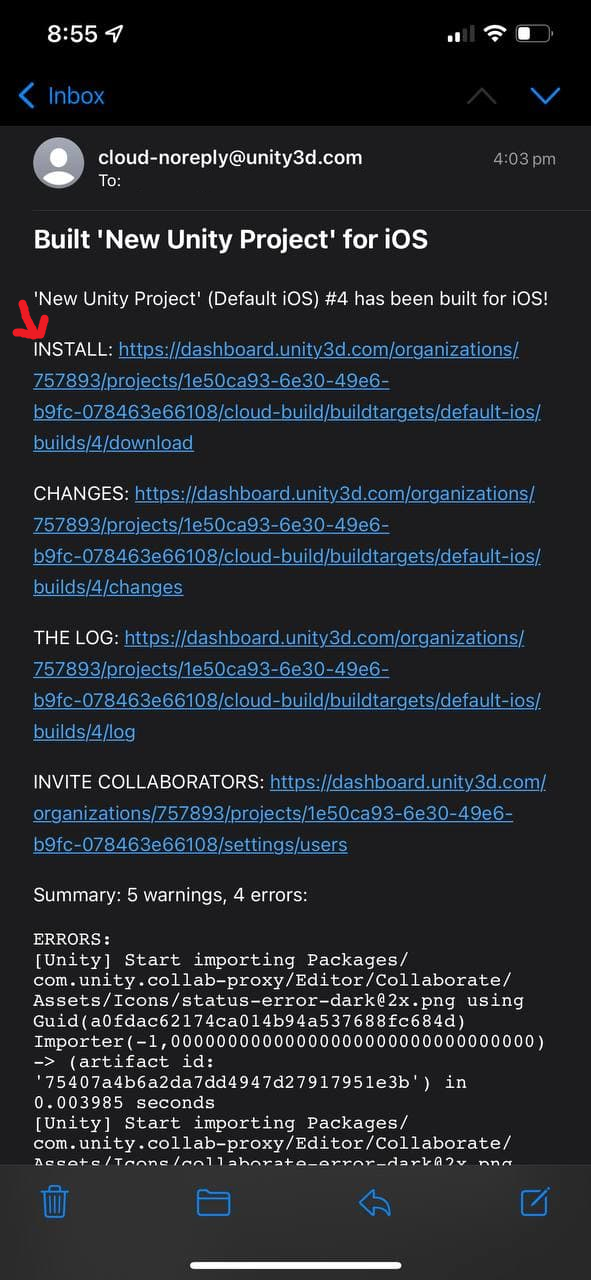
Once the build has been finished, if it is successful. Unity will send you an email to your email address with the link to download the application.
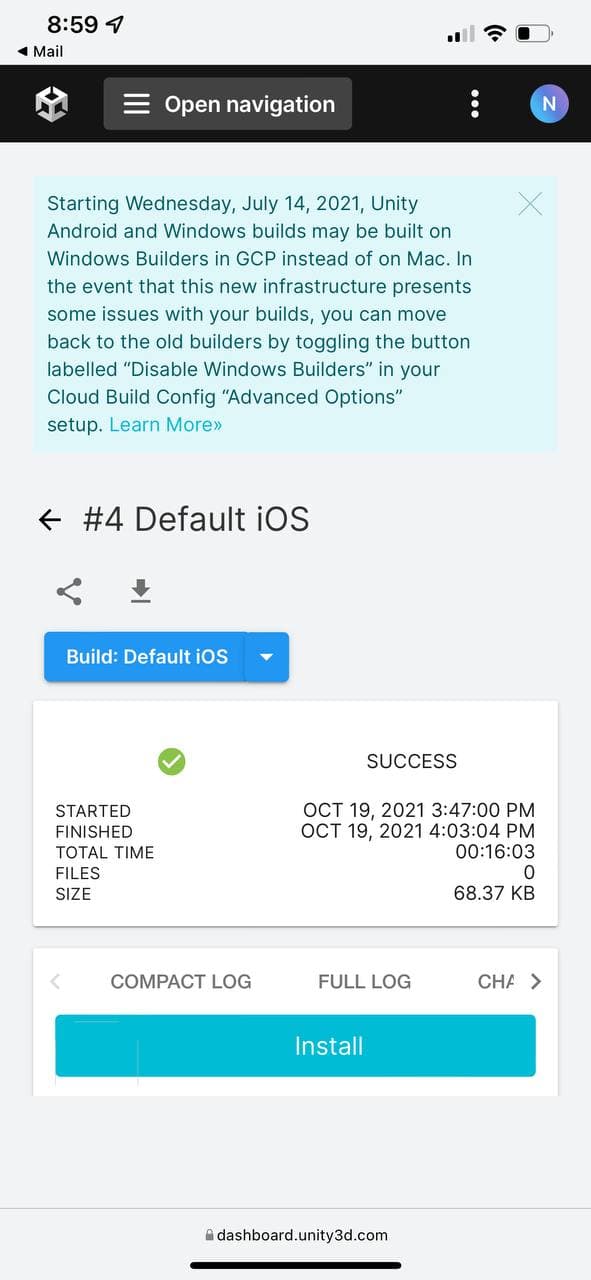
Open that email on your phone → Click on Install → A web page will open → Here you need to sign in into your Unity account
Click on Install
Unity will ask you to install a profile on your phone to verify your UDID. Go to your phone setting → General → VPN & Device Management → Click on Unity Profile and install it
Now go back to the Unity page and click on install. Unity will start downloading the app and install it on your phone.
Click on the app and it should open!
Step 8
How to build the project again
You might add some changes to your project and might need to build it again then all you have to do push the changes to git repository we created. So just add your changes to Unity file and close Unity once you are done.
Open GitHub → Select your repository → In the Summary section write down a brief description of your changes → Click commit → Click on Push origin
This will upload the file to repository. Unity will automatically build the file every time the repository changes so you don't have to do anything.
Once the build finished Unity will send you an email. You can also check the status of build in Unity dashboard build history section.